Driver
Once you defined your dataflow in a Python module, you need to create a Hamilton Driver to execute it. This page details the Driver basics, which include:
Defining the Driver
Visualizing the dataflow
Executing the dataflow
For this page, let’s pretend we defined the following module my_dataflow.py:
# my_dataflow.py
def A() -> int:
    """Constant value 35"""
    return 35

def B(A: int) -> float:
    """Divide A by 3"""
    return A / 3

def C(A: int, B: float) -> float:
    """Square A and multiply by B"""
    return A**2 * B
Define the Driver
First, you need to create a driver.Driver object. This is done by passing Python modules to the driver.Builder() object along other configurations and calling .build().
The most basic Driver is built like this:
# run.py
from hamilton import driver
import my_dataflow  # <- module containing functions to define dataflow

# variable `dr` is of type `driver.Driver`
# it is created by a `driver.Builder` object
dr = driver.Builder().with_modules(my_dataflow).build()
The .build() method will fail if the definition found in my_dataflow is invalid (e.g., type mismatch, missing annotations) allowing you to fix issues and iterate quickly.
The Driver is defined in the context you intend to run, separately from your dataflow module. It can be in a script, notebook, server, web app, or anywhere else Python can run. As a convention, most Hamilton code examples use a script named run.py.
Visualize the dataflow
Once you successfully created your Driver, you can visualize the entire dataflow with the following:
# run.py
from hamilton import driver
import my_dataflow

dr = driver.Builder().with_modules(my_dataflow).build()
dr.display_all_functions("dag.png")  # outputs a file dag.png
dr.display_all_functions()  # to view directly in a notebook
Dataflow visualizations are useful for documenting your project and quickly making sense of what a dataflow does (see Visualization).
Execute the dataflow
From the Driver, you can request the value of specific nodes by calling dr.execute(final_vars=[...]), where final_vars is a list of node names. By default, results are returned in a dictionary with {node_name: result}.
The following requests the node C and visualizes the dataflow execution:
# run.py
from hamilton import driver
import my_dataflow

dr = driver.Builder().with_modules(my_dataflow).build()
dr.visualize_execution(["C"], "execute_c.png")
results = dr.execute(["C"])

print(results["C"])  # access results dictionary
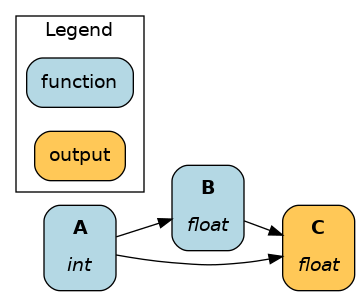
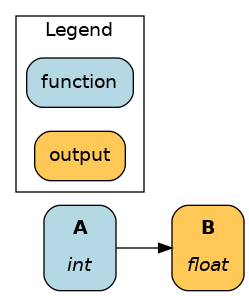
The Driver automatically determines the minimum required path to compute requested nodes. See the respective outputs for dr.visualize_execution(["C"]) and dr.visualize_execution(["B"]):
Development tips
With Hamilton, development time is mostly spent writing functions for your dataflow in a Python module. Rebuilding the Driver and visualizing your dataflow as you make changes helps iterative development. Find below two useful development workflows.
With a Python module
One approach is to define the dataflow and the Driver in the same file (e.g., my_dataflow.py). Then, you can execute it as a script with python my_dataflow.py to rebuild the Driver and visualize your dataflow. This ensures your dataflow definition remains valid as you make changes.
For example:
# my_dataflow.py
def A() -> int:
    """Constant value 35"""
    return 35

# ... more functions

# is True when calling `python my_dataflow.py`
if __name__ == "__main__":
    from hamilton import driver
    # __main__ refers to the file itself
    # and yes, a file can import itself as a module!
    import __main__

    dr = driver.Builder().with_modules(__main__).build()
    dr.display_all_functions("dag.png")
    dr.execute(["C"])
With a Jupyter notebook
Another approach is to define the dataflow in a module (e.g., my_dataflow.py) and reload the Driver in a Jupyter notebook. This allows for a more interactive experience when you want to inspect the results of functions as you’re developing.
By default, Python only imports a module once and subsequent import statements don’t reload the module. We reload our imported module with importlib.reload(my_dataflow) and rebuild the Driver as we make changes to our dataflow.
# notebook.ipynb
# %%cell 1
import importlib
from hamilton import driver
import my_dataflow

# %%cell 2
# this will reload an already imported module
importlib.reload(my_dataflow)

# rebuild the `Driver` with the reloaded module and execute again
dr = driver.Builder().with_modules(my_dataflow).build()
dr.display_all_functions("dag.png")
results = dr.execute(["C"])

# %%cell 3
# do something with results
print(results["C"])
Learn other Jupyter development tips on the page Jupyter notebooks.
Recap
The Driver automatically assembles a dataflow from Python modules
The Driver visualizes the dataflow created from your code
Functions are executed by requesting nodes to driver
.execute()
Next step
Now, you know the basics of authoring and executing Hamilton dataflows! We encourage you to:
Write some code with our interactive tutorials
Kickstart your project with community dataflows
The next Concepts pages cover notions to write more expressive and powerful code. If you feel stuck or constrained with the basics, it’s probably a good time to (re)visit them. They include:
Materialization: interact with external data sources
Function modifiers: write expressive dataflows without repeating code
Builder: how to customize your Driver