Jupyter notebooks
There are two main ways to use Hamilton in a notebook.
Dynamically create modules within the notebook.
Import modules into the notebook.
1 - Dynamically create modules within your notebook
There’s two main ways, using the Hamilton Jupyter magic, or using ad_hoc_utils to create a temporary module.
Use Hamilton Jupyter Magic
The Hamilton Jupyter magic allows you to dynamically create a module from a cell in your notebook. This is useful for quick iteration and development.
Once you’re then happy, it’s easy to then write out a module with the functions you’ve developed using %%writefile magic.
To load the magic:
# load some extensions / magic...
%load_ext hamilton.plugins.jupyter_magic
Then to use it:
%%cell_to_module -m MODULE_NAME # more args
To see help on the magic, you can run %%cell_to_module --help, or just ?%%cell_to_module in a cell.
It should output information similar to the following:
-m, –module_name: Module name to provide. Default is jupyter_module. -c, –config: JSON config string, or variable name containing config to use. -r, –rebuild-drivers: Flag to rebuild drivers. -d, –display: Flag to visualize dataflow. -v, –verbosity: of standard output. 0 to hide. 1 is normal, default.
Example use:
%%cell_to_module -m MODULE_NAME --display --rebuild-drivers

def hello() -> str:
    return "hello"

def world(hello: str) -> str:
    return f"{hello} world"
Once you’re happy with the functions you’ve developed, you can then write them out to a module using the %%writefile magic:
%%writefile hello_world.py
Using ad_hoc_utils to create a temporary module (e.g. use in google colab)
You have the ability to inline define functions with your driver that can be used to build a DAG. We strongly recommend only using this approach when absolutely necessary — it’s very easy to build spaghetti code this way.
For example, say we want to add a function to compute the logarithm of avg_3wk_spend and not add it to some_functions.py, we can do the following steps directly in our notebook:
# Step 1 - define function
import numpy as np

def log_avg_3wk_spend(avg_3wk_spend: pd.Series) -> pd.Series:
    """Simple function taking the logarithm of spend over signups."""
    return np.log(avg_3wk_spend)
We then have to create a “temporary python module” to house it in. We do this by importing ad_hoc_utils and then calling the create_temporary_module function, passing in the functions we want, and providing a name for the module we’re creating.
# Step 2 - create a temporary modeul to house all notebook functions
from hamilton import ad_hoc_utils
temp_module = ad_hoc_utils.create_temporary_module(
     log_avg_3wk_spend, module_name='function_example')
You can now treat temp_module like a python module and pass it to your driver and use Hamilton like normal:
# Step 3 - add the module to the driver and continue as usual
dr = driver.Driver(config, some_functions, temp_module)
df = dr.execute(['avg_3wk_spend', 'log_avg_3wk_spend'], inputs=input_data)
Caveat with this approach:
Using a “temporary python module” will not enable scaling of computation by using Ray, Dask, or Pandas on Spark. So we suggest only using this approach for development purposes only.
2 - Importing modules into your notebook
This tutorial can also be found published on TDS.
Step 1 — Install Jupyter & Hamilton 
I assume you already have this step set up. But just in case you don’t:
pip install jupyterlab
pip install sf-hamilton
Then to start the notebook server it should just be:
Step 2— Set up the files 
Start up your Jupyter notebook.
Go to the directory where you want your notebook and Hamilton function module(s) to live.
Create a python file(s). Do that by going to “New > text file”. It’ll open a “file” editor view. Name the file and give it a
.pyextension. Once you save it, you’ll see that jupyter now provides python syntax highlighting. Keep this tab open, so you can flip back to it to edit this file.Start up a notebook that you will use in another browser tab.
Step 3— The basic process of iteration 
At a high level, you will be switching back and forth between your tabs. You will add functions to your Hamilton function python module, and then import/reimport that module into your notebook to get the changes. From there you will then use Hamilton as usual to run and execute things and the notebook for all the standard things you use notebooks for.
Let’s walk through an example.
Here’s a function I added to our Hamilton function module. I named the module some_functions.py (obviously choose a better name for your situation).
import pandas as pd

def avg_3wk_spend(spend: pd.Series) -> pd.Series:
    """Rolling 3 week average spend."""
    print("foo") # will use this to prove it reloaded!
    return spend.rolling(3).mean()
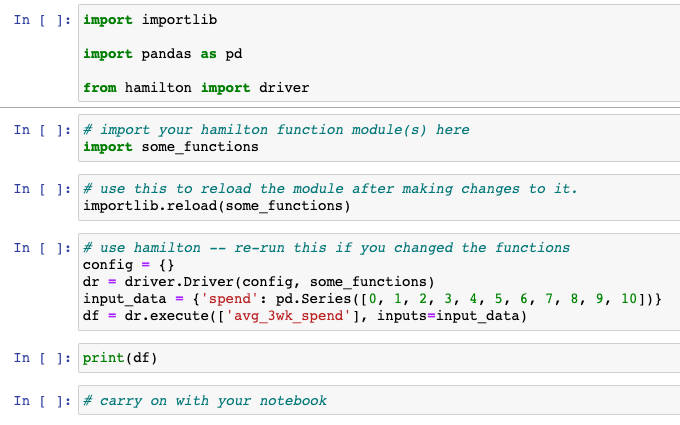
And here’s what I set up in my notebook to be able to use Hamilton and import this module:
Cell 1: This just imports the base things we need; see the pro-tip at the bottom of this page for how to automatically reload changes.
import importlib
import pandas as pd
from hamilton import driver
Cell 2: Import your Hamilton function module(s)
# import your hamilton function module(s) here
import some_functions
Cell 3: Run this cell anytime you make and save changes to some_functions.py
# use this to reload the module after making changes to it.
importlib.reload(some_functions)
What this will do is reload the module, and therefore make sure the code is up to date for you to use.
Cell 4: Use Hamilton
config = {}
dr = driver.Driver(config, some_functions)
input_data = {'spend': pd.Series([0, 1, 2, 3, 4, 5, 6, 7, 8, 9, 10])}
df = dr.execute(['avg_3wk_spend'], inputs=input_data)
You should see foo printed as an output after running this cell.
Okay, so let’s now say we’re iterating on our Hamilton functions. Go to your Hamilton function module (some_functions.py in this example) in your other browser tab, and change the print("foo") to something else, e.g. print("foo-bar"). Save the file — it should look something like this:
def avg_3wk_spend(spend: pd.Series) -> pd.Series:
    """Rolling 3 week average spend."""
    print("foo-bar")
    return spend.rolling(3).mean()
Go back to your notebook, and re-run Cell 3 & Cell 4. You should now see a different output printed, e.g. foo-bar .
Congratulations! You just managed to iterate on Hamilton using a Jupyter notebook!
To summarize this is how things ended up looking on my end:
Here’s what my
some_functions.pyfile looks like:

Here’s what my notebook looks like:
Pro-tip: You can use ipython magic to autoreload code
Open a Python module and a Jupyter notebook side-to-side, and then add %autoreload ipython magic to the notebook to auto-reload the cell:
from hamilton.driver import Driver

# load extension
%load_ext autoreload
# configure autoreload to only affect specified files
%autoreload 1
# import & specify my_module to be reloaded
# i.e. this is the data transformation module that I have open in other tab
%aimport my_module

hamilton_driver = Driver({}, my_module)
hamilton_driver.execute(['desired_output1', 'desired_output2'])
You’d then follow the following process:
Write your data transformation in the open python module
In the notebook, instantiate a Hamilton driver and test the DAG with a small subset of data.
Because of %autoreload, the module is reimported with the latest changes each time the Hamilton DAG is executed. This approach prevents out-of-order notebook executions, and functions always reside in clean .py files.
Credit: Thierry Jean’s blog post.
Pro-tip: You can import functions directly 
The nice thing about forcing Hamilton functions into a module, is that it’s very easy to re-use in another context. E.g. another notebook, or directly.
For example, it is easy to directly use the functions in the notebook, like so:
some_functions.avg_3wk_spend(pd.Series([0, 1, 2, 3, 4, 5, 6, 7, 8, 9, 10]))
Which calls the avg_3wk_spend function we defined in the some_functions.py module.